Hands-on wxPython
Andrea Gavana - PyCon Argentina 2012
Who Am I

I am a Senior Reservoir Engineer at Maersk Oil in Copenhagen, Denmark, where I mix a 10-years reservoir engineering knowledge with the power of Python and its libraries to solve many everyday problems arising during the numerical studies of oil and gas fields.
I am the author and the maintainer of the AGW (Advanced Generic Widgets) library for wxPython, a large collection of owner-drawn and custom widgets shipped officially with every new release of wxPython.
Contacts:
- E-mail: andrea.gavana@gmail.com
- Twitter: @AndreaGavana
Tutorial Description
This tutorial is a quick introduction to wxPython, divided in two parts:
- Build a skeleton of a wxPython application
- Basics of creating custom controls with wxPython
Sources are available here. The tutorial is online at my web page.
 Tutorial location
- Full tutorial (zipped - RECOMMENDED): http://bit.ly/SNGeSG
- Online version: http://bit.ly/TJ8W8E
- Zipped archive of scripts: http://bit.ly/QHw75T
All code and material is licensed under a Creative Commons Attribution 3.0 United States License (CC-by) http://creativecommons.org/licenses/by/3.0/us
Introduction
wxPython is one of the most famous frameworks used to build graphical user interfaces (GUIs) in Python. It provides native look and feel widgets on all supported platforms (Windows, Linux/Unix, Mac) and it has a vast repository of owner-drawn controls. In addition, the wxPython demo is the place where to start looking for examples and source code snippets.
Code editors
If you plan to run the various scripts available in this tutorial directly from your preferred editor, you should check that it does not interfere with the wxPython event loop. Eclipse, Wingware IDE, Editra, Ulipad, Dr. Python and newest versions of IDLE (and many other editors) support this functionality. If your preferred editor does not - you can easily find out by running the Hello World sample and see if it hangs - you can still run the samples via the command line:
$ python hello_world.py
Documentation
This tutorial contains many links to the documentation referring to the next generation of wxPython - codenamed Phoenix. The reasons behind this choice are:
- The quality of the Phoenix documentation is much higher
- Backward-incompatibilities between Phoenix and the previous versions of wxPython are relatively few
- Phoenix is going to take over the world in a few months :-)
A First Application
In this section, we are going to build step by step a skeleton of a wxPython application, enriching it incrementally. Every sub-section contains one or more exercises for you to familiarize yourself with the wxPython framework.
Hello world
 Documentation

As in (almost) all every other language and library, this is the simplest “Hello World” application you can write in wxPython:
# In every wxPython application, we must import the wx library
import wx

# Create an application class instance
app = wx.App()

# Create a frame (i.e., a floating top-level window)
frame = wx.Frame(None, -1, 'Hello world')

# Show the frame on screen
frame.Show()

# Enter the application main loop
app.MainLoop()
The last line enters what wxPython defines as “MainLoop”. A “MainLoop” is an endless cycle that catches up all events coming up to your application. It is an integral part of any windows GUI application.
Although the code is very simple, you can do a lot of things with your window. You can maximize it, minimize it, move it, resize it. All these things have been already done for you by the framework.
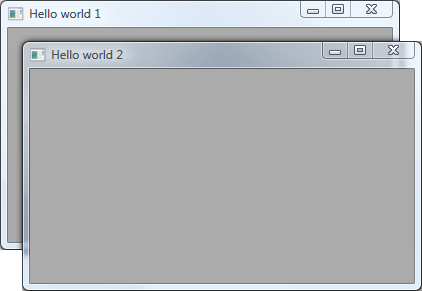
Exercises
Using the Hello World sample:
- Modify it to create two frames instead of one, setting their title as “Hello 1” and “Hello 2”.
- Using the modified script in (1), make the second frame a child of the first.
Observe what happens in (1) and (2) when you close the first frame. Does the application terminate?
Click on the figure for the solution.
Menubar and statusbar
Documentation
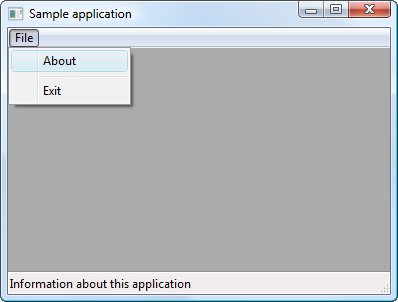
Almost all the applications sport a menu bar and a status bar in their main window.
A menu bar is a very powerful tool to let the user interact with your GUI as it displays (various levels of) cascading menus with multiple options.
A status bar is a narrow window that can be placed along the bottom of a frame and it is mostly used to give small amounts of status information.
import wx

class MainWindow(wx.Frame):

    def __init__(self, parent, title):

        wx.Frame.__init__(self, parent, title=title)

        # A Statusbar in the bottom of the window
        self.CreateStatusBar()

        # Setting up the menu
        file_menu = wx.Menu()

        # wx.ID_ABOUT and wx.ID_EXIT are standard IDs provided
        # by wxWidgets.
        file_menu.Append(wx.ID_ABOUT, '&About',
                         'Information about this application')
        file_menu.AppendSeparator()
        file_menu.Append(wx.ID_EXIT, 'E&xit', 'Exit the application')

        # Creating the menubar
        menu_bar = wx.MenuBar()

        # Adding the 'file_menu' to the menu bar
        menu_bar.Append(file_menu, '&File')

        # Adding the menu bar to the frame content
        self.SetMenuBar(menu_bar)
        self.Show()

app = wx.App(False)
frame = MainWindow(None, 'Sample application')
app.MainLoop()
Notice the wx.ID_ABOUT and wx.ID_EXIT ids. These are standard ids provided by wxWidgets (see a full list here). It is a good habit to use the standard ID if there is one available. This helps wxPython know how to display the widget in each platform to make it look more native.
 Hints
Hints
- For part (2) you will need to use the SetStatusWidths and SetStatusText methods.
Exercises
Using the MenuBar and StatusBar sample:
- Modify it to add an “Edit” top menu with “Cut”, “Copy” and “Paste” sub-menus.
- Create a status bar with 2 fields, set the second field to have double width with respect to the first and and display today’s date in the second field.
Click on the figure for the solution.
Event handling
Documentation
Reacting to events in wxPython is called event handling. An event is when “something” happens on your application (a button click, text input, mouse movement, a timer expires, etc...). Much of GUI programming consists of responding to events.
You link a wxPython object to an event using the Bind() method:
class MainWindow(wx.Frame):

    def __init__(self, parent, title):

        wx.Frame.__init__(self, parent, title=title)

        # Other stuff...

        menu_item = file_menu.Append(wx.ID_EXIT, 'E&xit', 'Exit the application')
        self.Bind(wx.EVT_MENU, self.OnExit, menu_item)
This means that, from now on, when the user selects the “Exit” menu item, the method OnExit will be executed. wx.EVT_MENU is the “select menu item” event. wxPython understands many other events (everything that starts with EVT_ in the wx namespace).
The OnExit method has the general declaration:
def OnExit(self, event):

    # Close the frame, cannot be vetoed if force=True
    self.Close(force=True)
Here event is an instance of a subclass of wx.Event. For example, a button-click event - wx.EVT_BUTTON - is a subclass of wx.Event.
Working with events is straightforward in wxPython. There are three steps:
- Identify the event binder name: wx.EVT_BUTTON, wx.EVT_CLOSE, etc...
- Create an event handler. It is a method called when an event is generated
- Bind an event to an event handler
Sometimes we need to stop processing an event: for example, think about a user closing your main application window while the GUI still contains unsaved data. To do this, we call the method Veto() on an event, inside an event handler:
class MainWindow(wx.Frame):

    def __init__(self, parent, title):

        wx.Frame.__init__(self, parent, title=title)

        # Other stuff...

        self.Bind(wx.EVT_CLOSE, self.OnClose)


def OnClose(self, event):

    # This displays a message box asking the user to confirm
    # she wants to quit the application
    dlg = wx.MessageDialog(self, 'Are you sure you want to quit?', 'Question',
                           wx.YES_NO | wx.NO_DEFAULT | wx.ICON_QUESTION)

    if dlg.ShowModal() == wx.ID_YES:
        self.Destroy()
    else:
        event.Veto()
Adding widgets
Documentation
We are going to add an editable text box inside our frame (a wx.TextCtrl). By default, a text box is a single-line field, but the wx.TE_MULTILINE parameter allows you to enter multiple lines of text.
class MainWindow(wx.Frame):

    def __init__(self, parent, title):

        wx.Frame.__init__(self, parent, title=title)

        self.control = wx.TextCtrl(self, style=wx.TE_MULTILINE)
A couple of things to notice:
- The text box is a child of the frame.
- When a frame frame has exactly one child window, not counting the status and toolbar, this child is resized to take the entire frame client area.
We can create a link between the wx.TextCtrl behaviour and the menu selected by the user by binding menu events (like “Cut”, “Copy” and “Paste” menu selections) to the main frame and process the results in an event handler. For example:
class MainWindow(wx.Frame):

    def __init__(self, parent, title):

        wx.Frame.__init__(self, parent, title=title)

        self.control = wx.TextCtrl(self, style=wx.TE_MULTILINE)

        # Other stuff, menubar creation, etc...

        # Bind the "copy menu event" to the OnCopy method
        self.Bind(wx.EVT_MENU, self.OnCopy, id=wx.ID_COPY)


    def OnCopy(self, event):

        # See if we can copy from the text box...
        if self.control.CanCopy():
            # Actually copy the wx.TextCtrl content
            # into the clipboard
            self.control.Copy()
In the OnCopy event handler we simply check if we can copy text from the text box (i.e., if something is selected and can be copied to the clipboard) and we actually copy what is selected into the clipboard.
Hints

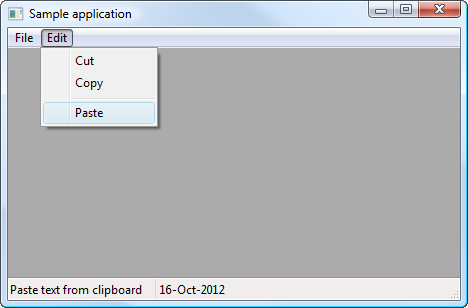
Exercises
Using the Widgets sample:
- The “Edit” top menu has the “Cut”, “Copy” and “Paste” sub-menus: bind the correct events to the main frame and add event handlers for these menus.
- Check that you can copy/paste text to/from another application (i.e., a word processor or an IDE).
- Look at another implementation of the Widgets sample: what did I do differently?
Click on the figure for the solution.
Creating Custom Controls - Basics
In this section, we are going to look at few generalities about custom controls and how to draw custom objects on some wxPython windows. Unfortunately the entire “owner-draw” subject is way too big to be covered during a short tutorial, but this section should at least get you started and whet your appetite for more.
(If you want to hear more details, please feel free to contact me at any time during the PyAr conference).
Device contexts and paint events
A DC is a device context onto which graphics and text can be drawn. It is intended to represent different output devices and offers a common abstract API for drawing on any of them.
DCs have many drawing primitives:
- DrawBitmap, DrawEllipse, DrawLine, DrawLines, DrawPoint, DrawPolygon, DrawRectangle, DrawRoundedRectangle, DrawSpline, DrawText, etc...
And they work with GDI objects:
- wx.Font, wx.Bitmap, wx.Brush, wx.Pen, wx.Mask, wx.Icon, etc...
Some device contexts are created temporarily in order to draw on a window. This is true for some of the device contexts available for wxPython:
- ScreenDC: Use this to paint on the screen, as opposed to an individual window.
- ClientDC: Use this to paint on the client area of window (the part without borders and other decorations), but do not use it from within an PaintEvent.
- PaintDC: Use this to paint on the client area of a window, but only from within a PaintEvent.
- WindowDC: Use this to paint on the whole area of a window, including decorations. This may not be available on non-Windows platforms.
Let’s focus on the PaintDC, which is one of the most commonly used. To use this device context, we want to bind a paint event for a window to an event handler, which will be responsible for drawing (almost) anything we want onto our window:
Documentation
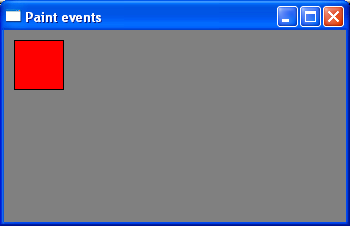
class MainWindow(wx.Frame):

    def __init__(self, parent, title):

        wx.Frame.__init__(self, parent, title=title)

        # Bind a "paint" event for the frame to the
        # "OnPaint" method
        self.Bind(wx.EVT_PAINT, self.OnPaint)
        self.Show()


    def OnPaint(self, event):

        dc = wx.PaintDC(self)

        # Set a red brush to draw a rectangle
        dc.SetBrush(wx.RED_BRUSH)
        dc.DrawRectangle(10, 10, 50, 50)
The PaintEvent is triggered every time the window is redrawn, so we can be sure that our red rectangle will always be drawn when the operating system wants to “refresh” the content of our window.
Similar things can be done using other graphical primitives, like DrawPoint:
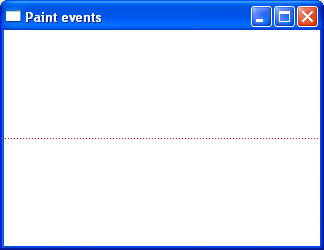
def OnPaint(self, event):

    dc = wx.PaintDC(self)

    # Use a red pen to draw the points
    dc.SetPen(wx.Pen('RED'))

    # Get the size of the area inside the main window
    w, h = self.GetClientSize()
    # Draw a sequence of points along the mid line
    for x in range(1, w, 3):
        dc.DrawPoint(x, h/2)
Documentation
Or drawing text strings onto our window by using DrawText:
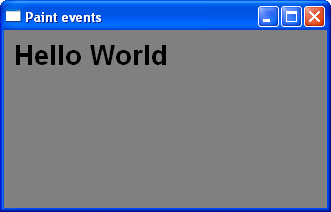
def OnPaint(self, event):

    dc = wx.PaintDC(self)

    # Use a big font for the text...
    font = wx.Font(20, wx.SWISS, wx.NORMAL, wx.BOLD)
    # Inform the DC we want to use that font
    dc.SetFont(font)

    # Draw our text onto the DC
    dc.DrawText('Hello World', 10, 10)
Hints
- See the DrawLine, the DrawText and the GetFullTextExtent methods.
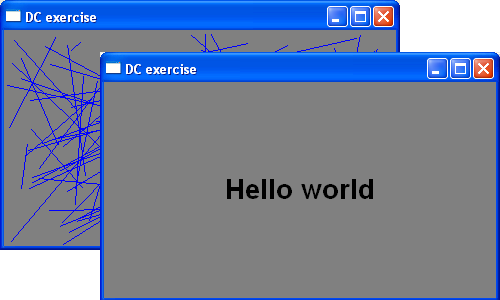
Exercises
Modify the DC sample such that:
- Using the random module, draw a number (let’s say 100) of random lines inside the wx.Frame client area.
- Looking at the previous snippets of code which uses DrawText, and using the width and height returned by the DC.GetFullTextExtent method, can you draw a string centered in the frame client area?
Click on the figure for the solution.
Additional resources and tutorials
- The ZetCode tutorial on drawing
- Creating custom control with wxPython Wiki page